CLICK HERE FOR FREE BLOGGER TEMPLATES, LINK BUTTONS AND MORE! »

Tuesday, May 3, 2011

Enter to Win a Cricut Expression 2

Wanna win a Cricut? I do too! To enter to win a Cricut cutting machine go HERE to fill out your entry. You can enter once a day until May 14th. So head on over and enter for your chance to win. Congrats to Karis for winning the give-away for the month of April.  Happy Crafting!

Friday, April 22, 2011

Oh Toothless one and Giveaway! UPDATED!


Well the other day, I received the dreaded call from my daughter's school; she had an accident on the playground and long story short she had her two front teeth pulled. She is such a trooper! So glad that she is getting back to the "normal" Emma again! She loved having the tooth fairy visit and now she thinks that the Easter bunny will be bringing her a little something too. Ha. In honor of Em losing her teeth I am hosting a giveaway!  The winner will have their choice of a  bow or paci clip.You will have 5, YES 5 chances to win.


First, comment and tell me about your favorite Easter traditions in your family. Second, go and "like" my facebook page and leave another comment that you did so. Third, follow my blog and  comment below that you are a follower. Fourth, share the giveaway on your blog with the link and leave your name and link in the comments. Fifth and final way to enter,  share the giveaway and link on your facebook page and comment below with your name and the link.  The giveaway will close on Thursday at midnight!
I will use the random number picker and choose a lucky winner! Just leave your name and email so I can contact you if you win. Happy Crafting! 


Friday, April 15, 2011

Nothin' Says Spring Like Easter...


Saw this cute tutorial on Make it and Love it. Ashley has the cutest ideas. Here is one for Easter; egg garland! How adorable, and  you can customize the egg color scheme too! So hop on over to Make it and Love it and create your very own egg garland for your place! Hope wherever you are that you are able to enjoy this wonderful spring weather! Happy Crafting! 

Saturday, January 22, 2011

Bible Cover/ Book Cover Tutorial

Want to make a cute book or Bible cover? Like this?


My daughter got a new Bible for Christmas, so I thought that I would make her one. It wasn’t just ANY Bible  cover, it’s a personalized one!  She loves things with her name on them. Here is the embroidery machine that I use when I embroider.  Are you ready to get started? Here are the materials you will need:
  • sewing machine
  • 1/2 to 3/4 yd. of cotton fabric
  • fusible fleece (optional)
  • scissors
  • thread 
  • rotary mat or measuring tape
#1Cut:
2 -pieces of fabric (one for the outside cover and one for the inside) that is 1.5 inches wider than your book.  The Bible I was using was 12 inches wide and 8.25 inches tall. ** If you are adding any kind of design or decoration for the "front" of your cover you should do this step now. Then proceed with the rest of the tutorial. If you have decided not to decorate, then designate one piece of fabric as the outer cover and the other piece as the inner cover. I will be referring to these throughout the tutorial.

  Make sure that you lay the spine completely flat when you are measuring!


You should have 2 pieces that look something like this: 
 #2 Next cut your handles. Cut 2 pieces of fabric 5 inches tall by 14 inches long. Fold the pieces so right sides are together (like a hotdog) and sew your seam. 


#3Next, you will want to turn both of your strips of fabric right side out so the seams are in the middle (like this)


#4Then top stitch each of the sides, leaving the ends open


#5Then pin the straps to the outer cover.(The outer cover is what everyone will be seeing when you carry your book.)  Make sure to measure so they are straight. I pinned mine 2 inches from the top and the bottom and sew them close to the edge. Repeat for the other side. 


#6Next, is an optional step. If you would like to have ties for your book carrier then do this next step, if you would prefer not to have ties, skip #11     . Cut 2 pieces of fabric that are 2 inches tall by 16 inches long. 

#7 Then you will want to iron a 1/4 inch fold for each strip. 


#8Then fold like a hot dog again and sew wrong sides together.


#9Fold the ends of the ties and sew closed for a finished look. 


#10 Pin ties to the outer cover. One on each side.  Make sure they are in the middle! They should be positioned in between each of your handles!


#11 Pocket for outside. Cut 1 piece that is 6 inches wide and 12 inches tall. Fold the pocket with right sides together so that the pocket now measures 6 inches wide by 6 inches tall.  The fold should be at the top. Sew down each of the sides leaving the bottom open. 


 Turn right side out.


  Fold the opening on the bottom inward and stitch all around the piece of fabric.  

#12 Pin the pocket to the back of the outer cover.  Sew the sides and bottom. Make sure to leave the top of the pocket open.


Once the pocket is attached the outer cover should look like this:
#13 This is also an optional step, although I would suggest it! Cut one piece of fusible fleece and iron it to the wrong side of the  outer cover. The fusible fleece gives the cover its loftiness and durability, it won't be a floppy cover! In the photo, my fleece isn't trimmed but, yours should be the exact size of your piece of fabric.
#14Now you will cut the flaps to keep your book inside of the cover. You will cut 2 pieces of fabric 10 inches tall and 8 inches wide. Fold in half like a hotdog so that each piece is 10inches by 4 inches. (wrong sides together) so that your pattern is facing you. Sew down each of the folds leaving all other edges raw and open.


 #15 Pin flaps to inside cover and sew raw edges top and bottom together. Leaving the folded side you previously sewed in step #14 open or not sewn to the inner cover. 


#16 Next you are going to sandwich your outside cover and inside cover.  Place the outside cover down first with right side facing up/or closest to you and the fusible fleece side on the table and  tuck in all straps and ties.
Then place the inside cover over top of the outside cover so that the wrong side of the fabric is facing you. You should have right sides together and wrong sides facing out on both pieces. 
Then sew each of the sides, the top and half of the bottom. 

#17 Use the opening at the bottom and turn right side out. Then topstitch around the outer edges. When you get to the opening you left to turn the fabric right side out, just tuck it in and sew together when top stitching. 

#18To add the book place front cover of the book in the flap, repeat for the back of the book and Voila!


You have a cute book/Bible cover that everyone will drool over! 


Sorry the directions are so long, I just like a lot of pictures and specific directions when I sew. I welcome your suggestions,
comments and pictures of final projects! You can post those on our facebook page for all to see! Please remember if you reference this tutorial on your blog or social networking site to please link it to my blog, lets give credit where credit is due! Thanks for sticking it out through this tutorial with me! Happy Crafting! 

Wednesday, January 19, 2011

Birthday shirts for a set of cutie twins...

So, since I’ve been talking a lot about Valentine’s Day, I thought that I would post a pic of my latest project. I just completed this order and who better to talk about at Valentine’s Day than two characters who have been in love for over 50 years.. Mickey and Minnie! I thought these shirts turned out adorable for twins Luke and Gracie’s first birthday! Happy Birthday Luke and Gracie, I hope you have a super special day! If you are interested in a Mickey or Minnie shirt, just send me an email or visit my website here!

                                          Happy Crafting! 

Monday, January 17, 2011

Valentine's Day Printables

I stumbled upon these ahhh-dorable
printable valentines from Skip to My Lou
 
I think they are so much cuter than store bought 

valentines, and your kiddos can help too! So head on over to
Skip to My Lou and print off your kiddos valentines!
Happy Crafting!


Sunday, January 9, 2011

Need an Idea for some Valentine's Day Treats? Check this out!


I saw something similar to these on http://theidearoom.blogspot.com
but it called for candy canes ..and I can't find any. So I came up with this instead.
So here's what y
ou need:
one bag of these pretzels.. they're called pretzel loops.


You will also need some either chocolate melts or chocolate chips. I used 2 bags of semi-sweet chocolate chips, but you can use white chocolate too. Here's the rest of what you will need:
Lollipop sticks, bags to put the
finished lollipops inside, and a piping bag or large baggie to pipe the chocolate into the pretzels.
First, lay out a sheet of wax paper. Arrange the lo
llipop stick between the 2 loops so it resembles a heart (like this):


Next, you need to start your double boiler to melt the chocolate. I used 2 bags of chocolate chips and was able to get 35 lollipops out of them. A double boiler are 2 pots, one is slightly larger than the other. The pot that sits directly on the stove has water in it that boils to heat the pot that is on top of it. So the chocolate doesn't scorch as easily. This is what it will look like:
Melt the chocolate til its nice and thin... I had to add a little water to mine. Once the chocolate is melted, transfer the chocolate into piping bags or large baggies. Cut a small hole in the tip of the piping bag or if you are using a baggie, clip one of the bottom corners. Start small, you can always cut off more if you need to.
I found this tip after I had made my suckers so I don't have a picture of it, but pipe a small amount of chocolate under the lollipop stick before you fill in the pretzel loop. This make your heart lollipop sturdier. Then begin piping chocolate into your loops. Then smooth it out with your finger.

Make sure that you spread it out to fill in the entire loop and to cover your stick.. This is what holds your lollipop together once it has set. Then you can decorate if you would like. This was my daughter's favorite step. We used red decorating sugar sprinkles. Keep filling and smoothing until you have either run out of sticks or chocolate! :)

Then cut your wax paper into sections that can fit onto cookie sheets. Place them in the refrigerator to set. Once the chocolate has hardened, the lollipops easily peel off of the paper. Be very gentle with them, they do break! Next, package them so they can be given away or kept fresh. I used Wilton brand treat bags and cut a little off the bottom. They also come with twist ties so you can close them up. Here's the finished product. They are very yummy with the salty-ness from the pretzel and the sweet from the chocolate. Enjoy!
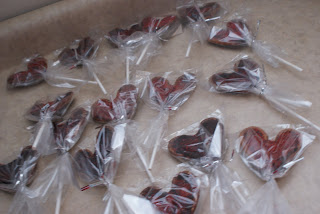


Related Posts Plugin for WordPress, Blogger...